Vanilla Cake Mixed Berry Trife + Homemade Whipped Cream

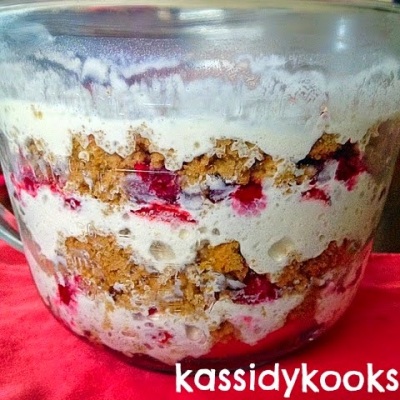
Hey! Hopefully all of my Canadians had a great Canada Day. I just hung out at home with the family, it was nice that we were all together on a weekday, it’s very rare that the four of us are all home at the same time. So I was glad to soak it all up. In preparation for our Canada Day meal I wanted to put together a dessert that was red and white. When it comes to holidays I like to make theme desserts, they’re just more fun to make and eat. I have never made a trifle before but I thought it would be a perfect summer treat. And it was, it was sweet, creamy and delicious.

While still tasting great it was also pretty healthy. I made a healthier vanilla gluten free vegan cake and used strawberries and raspberries for the fruit. Although I didn’t sub anything for the whipped cream, it’s delicious and cannot be replaced. Although next time I’m going to make it with coconut whipped cream for a complete vegan dessert. My family loved it, and it was refreshing to eat after a hot day.

Vanilla Cake Mixed Berry Trifle
Vanilla Cake – Minimum two 8×8 cakes (Any vanilla cake recipe you like, I used Chocolate Covered Katie’s Kid Approved Healthy Cake, the sub’s I made was replacing the flour with gluten free oat flour and omitting the 1/4 cup sugar, I also used brown sugar)
1 Cup each of Strawberries and Raspberries 
Homemade Whipped Cream
*473ml of Whipping Cream, the small carton of whipping cream 
1 tsp Vanilla
1 tbsp White Sugar
Whipped Cream Directions: In a bowl of stand mixer combine the cream, vanilla and sugar. Start off mixing it slow and as it gets thicker beat it on high. Beat until it’s thick and soft peaks form. Be careful not to over beat as it can turn into butter. 
Trifle Directions: It’s best to make the trifle an hour before serving, but make the cake beforehand. Make cake according to recipe directions and let cool. Make whipped cream and place in the fridge until needed. While the cake is cooling wash and cut strawberries into slices and wash raspberries, place both into a bowl. Take your cake and cut into bite sized pieces. In a large bowl place some cake pieces into the bottom, than spoon some whipped cream over top and place strawberries and raspberries over the whipped cream. Repeat layers of cake, whipped cream and berries until you reach the top of the bowl. Place uncovered in the fridge for an hour, the cake will absorb the whipped cream so don’t go light on the cream. Spoon onto plates and enjoy!

Note: To make vegan, sub whipping cream with coconut cream. A good recipe here.

Chocolate is great, but every now and then a fruit based dessert just hits the spot. It’s light and refreshing and it’s a great way to take advantage of all the abundance of fruit during the summer months.

Although I had no clue had to serve it, so I just took a big spoon and put it on plates. Unfortunately it doesn’t look as pretty as it did in the bowl, but it still tasted great. If you’re looking to make something for the fourth of July, go ahead and add some blueberries. It’s a great recipe where you can sub something else for vanilla cake and any other fruit for the strawberries and raspberries and it will still turn out. Hope you enjoy it!

Protein Green Smoothie

As the temperatures climb higher my desire for a hot breakfast declines. In the summer months I crave cold food for breakfast. Overnight oats and smoothies move in and oatmeal and eggs move out.  I’ve made many different green smoothies over the past couple years but I’m never been 100% in love with it. In some you can taste the spinach too much and others don’t keep me very full. But alas I have found my go to smoothie and it has met my every desire. It’s sweet but not overly, tastes like chocolate (yum), gives you a serving of vegetables and it keeps me full. Boo-ya.

Protein Green Smoothie
Serves 1
1 banana
2 big handfuls of spinach
1 scoop of chocolate protein powder (if you don’t have protein powder you can sub 2 tbsp of unsweetened cocoa powder, however it will not be a protein smoothie)
1 tbsp of natural peanut butter (or another nut or seed butter)
Milk of choice, I don’t measure. Use a little for a thick smoothie and more for a thinner smoothie. (I use unsweetened almond milk)
4 ice cubes
Optional: 1/8 tsp of pure peppermint extract for a mint chocolate protein smoothie. 
Directions: In a high powered blender combine everything and blend until smooth. Pour into a glass and enjoy!

It has complex carbs, protein, fiber, healthy fats and a serving of veggies. It’s a powerhouse in a glass. Enjoy!

Stove Top Popcorn

I remember that when my brother and I would come home from school, we would turn on the TV to our favorite cartoon show and pop a bag of popcorn. Every single day, it was a ritual. Now instead of buying the microwaveable popcorn we make our own. It tastes better, is better for you (no chemicals!) and it’s cheap. Not only that but it has a lot of health benefits that people don’t know about, such as:

  • It’s high fiber
  • Contains antioxidants that helps protect body cells that can lead to disease (contain more than some fruits and vegetables!)
  • Is a whole-grain
  • Low calorie
  • Naturally gluten free

Those are all true if you make it yourself. The microwavable popcorn you buy at the store does contain fiber and is whole grain, but you’re eating all the added fat and calories that they add to that buttery substance. Not to mention that that bag contains chemicals that get leaked into the popcorn when made. And also don’t go nuts over the movie theater stuff either. It has a ton of added sodium and oil, so just be careful and enjoy in once in a while. I have been known to bring carrots into a movie theater (like who does that?) but also dominate a bag of popcorn, with some pretzel M&M’s thrown in. That was dinner once and it was oh so delicious. I didn’t regret it and would happily do it again :). It’s moderation! Eat what you want and move on, anyways enough rambling and let’s get on to the recipe.

Stove Top Popcorn
Makes enough for 1 or 2 smaller portions

A small pot
1/4 cup popcorn
2 tsp – 1 tbsp oil of choice, coconut, canola, olive oil etc… (choose the measurement of oil depending on the size of the pot, you want enough oil to cover the bottom plus a little excess, too little and the popcorn won’t pop)
Salt to taste
Optional Toppings: Cinnamon, Melted Butter, Parmesan Cheese, Chocolate Chips, Nutritional Yeast, Dried Dill etc…

Directions: In a small pot pour the oil in and place two kernels in the bottom. Turn heat to high and place the lid on, wait until you hear the kernels pop. This signals that it’s hot enough. Pour in the kernels and place the lid on. Lift the pot off the burner (so that it’s not directly on the heat), for gas stoves the pot can cause sparks if shaken directly on the grills and the pot may scratch ceramic stove top. Shake the pot repeatedly and open the lid every 15 seconds or so. Keep shaking until the popping stops. Turn off heat, pour into bowls and season as desired.

Do you see that melting chocolate?!

I’ve mentioned this before, but popcorn with chocolate is one of my all time favorite snacks. During the summer while I was training for my half-marathon, I would watch my favorite show at the time (Bunheads on ABCspark, sadly it got cancelled) and make popcorn with chocolate. I was running a lot and needed to carbo-load, or that’s what I told myself :). I even have a tradition that the night before every race I have popcorn with chocolate. Popcorn is a great whole-grain carb that fuels me up for the next day and the chocolate is there, because well it’s chocolate. And melted chocolate gets me every time.

Basic Rice Krispie Recipe

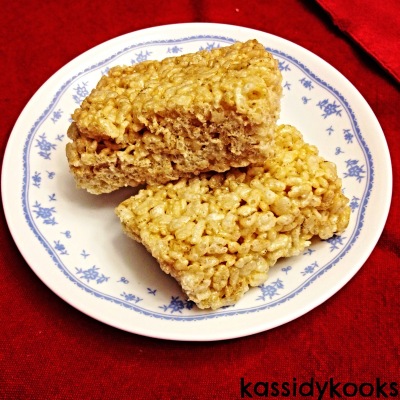
Sometimes the simplest things are the best things. A sunset in your backyard, vanilla ice cream and Rice Krispie squares. Rice Krispie squares were pretty much a childhood staple, packing the familiar blue wrapper in my lunch box was a common thing. The store bought kind were pretty good, but I don’t know what it is about homemade Rice Krispie squares that are 10 times better. And they’re so so easy to make! It just takes 4 ingredients and you have a dessert in under 15 minutes. Easy peasy.

Basic Rice Krispie Squares 
1/4 cup salted butter
4 cups miniature marshmallows
5 cups gluten free Rice Krispies
1 tsp pure vanilla
Directions: Grease 9×9 inch square pan with butter and set aside. To make the process easy, place the 5 cups of Rice Krispies in one bowl and the 4 cups of marshmallows in another bowl. In a large saucepan turn the heat to medium high and melt the butter until it starts to bubble. Turn the heat down low and pour the marshmallows into the saucepan and stir consistently until the marshmallows are melted. Take the saucepan off the heat and stir in the vanilla and Rice Krispies. Stir until the Rice Krispies are evenly coated with the marshmallow mixture. Pour the mixture into your buttered pan and using your fingers press down until it’s compacted (if it’s too sticky wet your hands lighly with water). Let sit until set. Cut into squares and enjoy!

I love that they have come out with gluten free rice krispie cereal. It tastes exactly like the original but it’s made with brown rice instead of white rice so it’s a bit better for you. To make vegan replace the butter and marshmallows with vegan products. I’ve seen whole foods carry vegan marshmallows and might try them next time. They’re a sticky and sweet treat that will bring you back to your childhood.